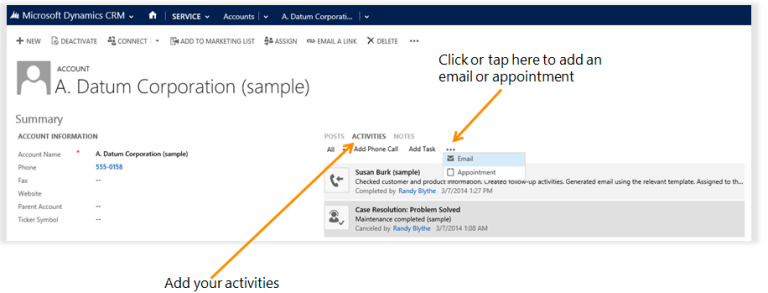
ADDING ACTIVITIES TO CASES
Add a phone call, task, email, or appointment activity to a case or record
Activities are actions or tasks you do when you contact a customer, for example, sending email, making phone calls, taking notes, adding tasks, or setting up appointments. You can create an activity and associate it with a customer, or if you’re working on a customer record, you can create an activity that is automatically associated with that customer.

Add a phone call
Select a work area from the sitemap: Sales, Service, or Marketing.
Click or tap the work area name, and then click or tap Accounts or Contacts.
Open the record you want to add the activity to.
If you do not see the Add Phone Call area open in the middle of the page, click or tap Activities > Add Phone Call.
In the Description area, provide a summary of the conversation with the customer. You must fill in this area before you can save the phone call.
The Call With field is automatically populated with the customer name you select in the account or contact field. You can select a different contact, account, lead, or user record if required.
By default, the direction is set to Outgoing. You can change it to Incoming by clicking or tapping the Phone Support button in the list of case records. To select multiple records, click or tap Look Up More Records, and then in the Look Up Records dialog box, select the records.
Select the Left voice mail check box if you make an outgoing call to a customer and leave a voice mail for them. You can also select this check box if a customer leaves a voice mail message when they call you.
Click or tap OK to save the activity.
NOTEBy default, every phone call activity that you add in context of a record is marked Completed when the record is saved at least once. However, if you add a phone call activity to an unsaved record, or if you create a new activity and then set the Regarding field of the activity to another entity record, the activity is set to an Open state. You can click or tap the Complete link to close the activity as Completed. The Complete link is available only after you save the case record at least once.
Add a task
From the sitemap, select Sales, Service, or Marketing.
Click or tap the work area name, and then click or tap Accounts or Contacts.
Open the record you want to add the activity to.
In the middle of the page, click or tap Activities > Add Task.
Fill in your information. Use the handy tooltips as a guide.
The Owner field is set to the current user by default. If you want to reassign the task, click or tap the lookup icon, and then select another user or team.
Click or tap OK to save the task.
Add an emailTo add an email activity to a record, you must first save the record you are adding the activity to.
Select a work area from the sitemap: Sales, Service, or Marketing.
Click or tap the work area name, and then click or tap Accounts or Contacts.
Open the record you want to add the activity to.
In the middle of the page, click or tap Activities > More Commands > Email.
Fill in your information. Use the handy tooltips as a guide.
To save the record, click or tap Save.
To add an attachment to the email, under Attachments, on the right, click or tap +.
To use a template for the email body, in the email editor, click or tap Insert Template, and then select the template.
To attach an article to the email, in the email editor, click or tap Insert Article, and then add the article.
Click or tap Save.
Add an appointment
To add an appointment activity to a record, you must first save the record you are adding the activity to.
Select a work area from the sitemap: Sales, Service, or Marketing.
Click or tap the work area name, and then click or tap Accounts or Contacts.
Open the record you want to add the activity to.
In the middle of the page, click or tap Activities > More Commands > Appointment.
Fill in your information. Use the handy tooltips as a guide.
To save the record, click or tap Save. Create an activity and associate it with a customer.
Create an activity from the activity areaYou can also create an activity from the Activity area and then link it to a customer or case.
Select a work area from the sitemap: Sales, Service, or Marketing, and then select Activities.
On the command bar, select and add an activity. Fill in your information. Use the handy tooltips as a guide.
Use the Regarding field on the activity form to associate it with a customer or support case.